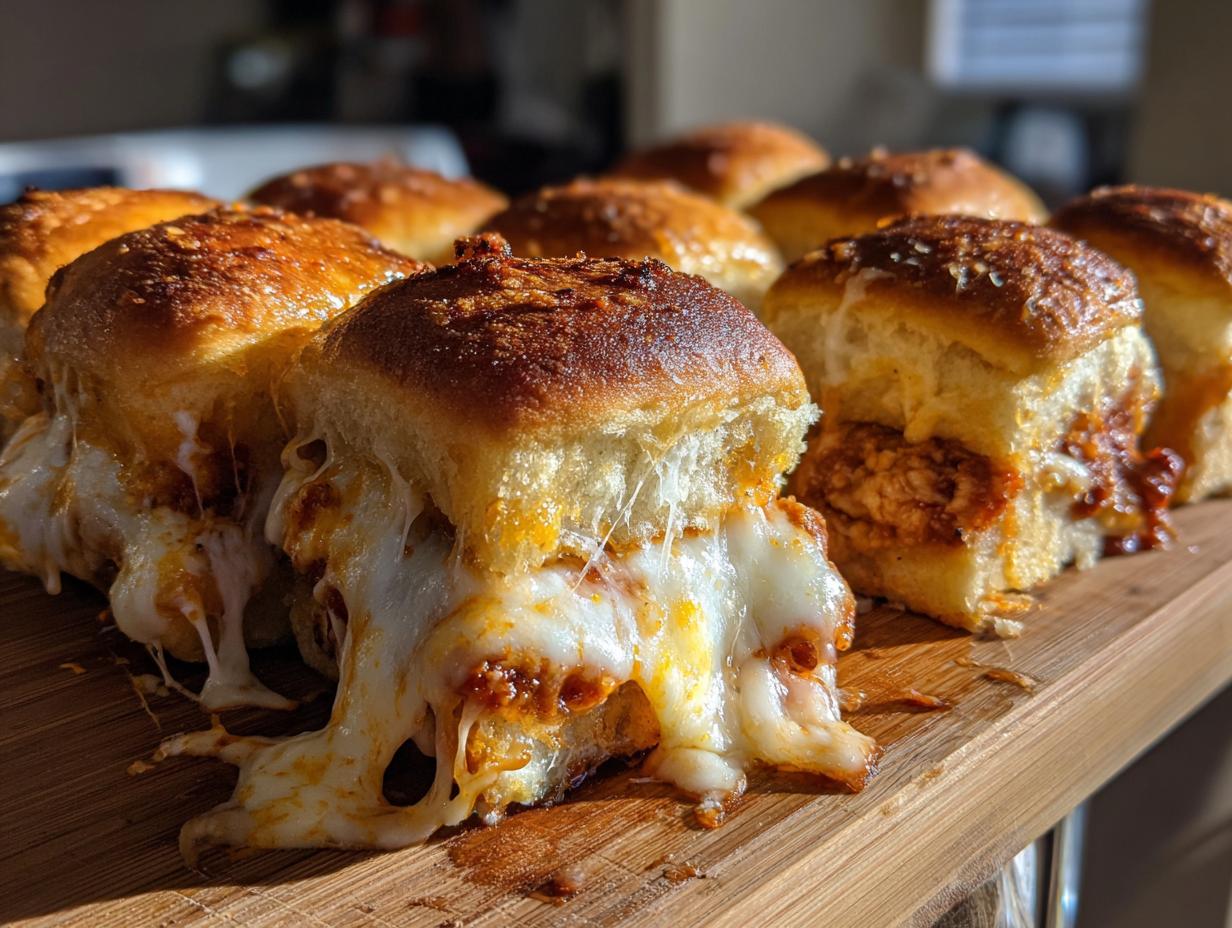
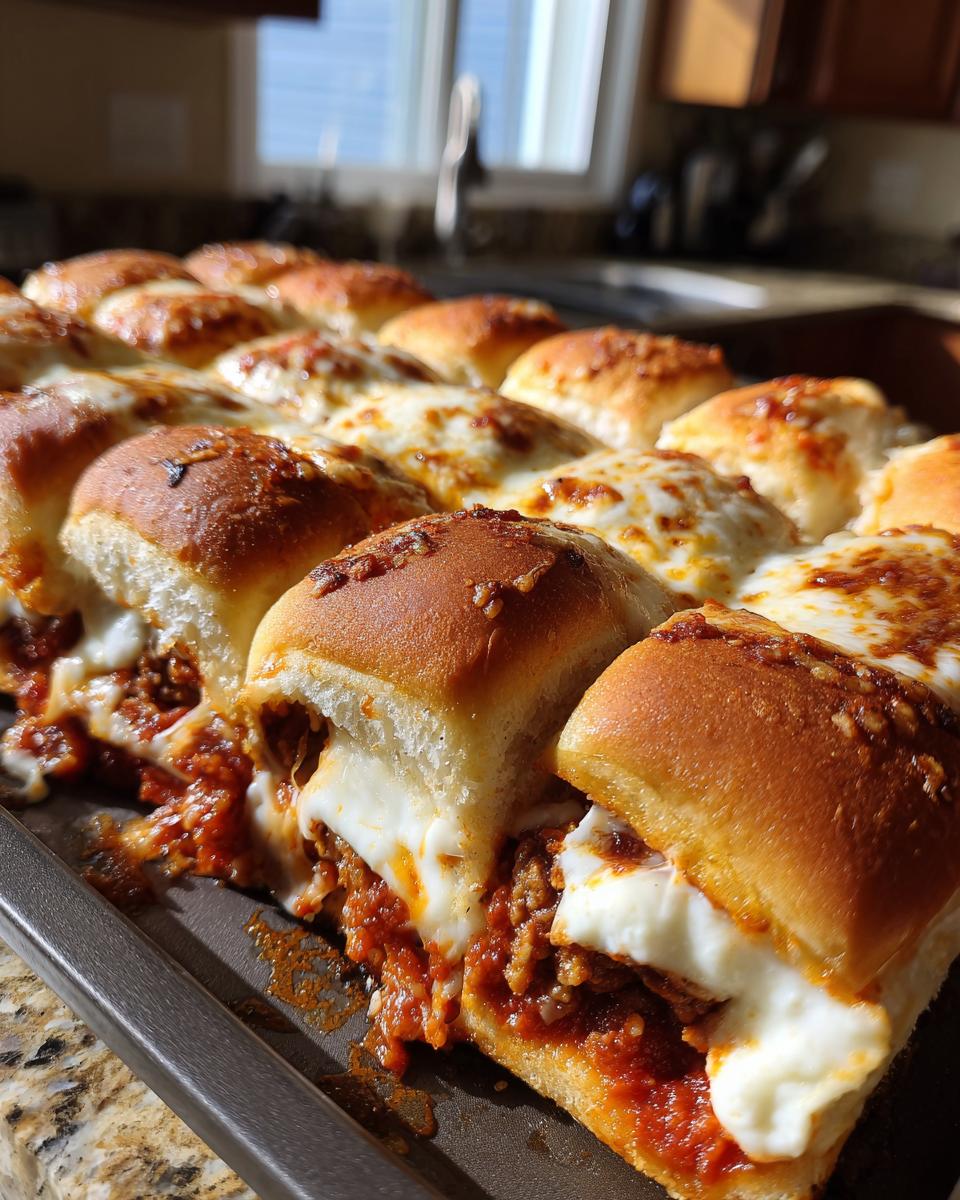
You know that moment when you bring out an appetizer and suddenly everyone at the party migrates toward the food table? That’s exactly what happens every time I make these pull-apart roasted garlic pizza dip sliders! I stumbled upon this magical combo when I needed something quick but impressive for my nephew’s graduation party last summer. Now they’re my go-to dish whenever friends come over – the kind of recipe that disappears faster than you can say “seconds please!” Imagine soft slider buns stuffed with melty cheese and rich roasted garlic pizza dip, all baked until golden and served warm. It’s basically a party in every bite.
Why You’ll Love These Pull-Apart Roasted Garlic Pizza Dip Sliders
Trust me, these sliders aren’t just good–they’re the kind of dish that makes people hover around the oven waiting for them to come out. Here’s why they’re a total win:
- The shareable factor: There’s something so fun about pulling apart warm, buttery sliders to reveal that gooey garlic-cheese filling. Perfect for passing around at game night or family dinners–no plates needed!
- Roasted garlic magic: Forget raw garlic’s sharp bite. Roasting turns it into sweet, caramelized goodness that melts right into the marinara and cheese. My secret? Use the whole head–you’ll thank me later.
- Cheese pulls for days: That moment when you lift a slider and the mozzarella stretches? Pure joy. The Parmesan adds a salty crunch that’ll have everyone reaching for seconds.
- Easy twists: Add pepperoni slices, swap in pesto, or go spicy with red pepper flakes. I’ve even used Hawaiian rolls for a sweet-savory twist when I’m feeling fancy.
Seriously, these sliders are like a hug in food form–warm, comforting, and impossible to resist. For more delicious recipes, check out my full recipe collection!
Ingredients for Pull-Apart Roasted Garlic Pizza Dip Sliders
Here’s everything you’ll need to make these irresistible sliders. I’ve learned through trial and error (and many happy taste-testers!) that quality ingredients really make a difference here. Pro tip: Measure everything before you start–this recipe comes together fast once the garlic is roasted!
- 1 head garlic (top sliced off–about 1/4 inch to expose the cloves)
- 2 tbsp olive oil (extra virgin for that fruity depth)
- 1 cup marinara sauce (my favorite jarred brand or homemade if I’m feeling ambitious)
- 1 cup shredded mozzarella (pack it lightly–none of that pre-shredded stuff with anti-caking agents!)
- 1/2 cup grated Parmesan (the real deal, not the shelf-stable powder)
- 1 tsp dried oregano (rub it between your palms to wake up the oils)
- 1 tsp dried basil (see oregano note–same goes here)
- 12 slider buns (Hawaiian rolls work in a pinch, but potato rolls are my MVP)
- 1/4 cup melted butter (cooled slightly so it doesn’t make the bun tops soggy)
- 1 tsp garlic powder (trust me, this double garlic hit is everything)
Ingredient Substitutions & Notes
Life happens, and sometimes you need to swap things out. Here’s how to adapt without sacrificing flavor:
- Fresh herbs: Out of dried? Use 1 tbsp chopped fresh basil or oregano. The brightness is amazing, but add it after baking as garnish so it doesn’t brown.
- Gluten-free: Swap in your favorite GF slider buns–just watch the baking time, as they can dry out faster.
- Vegan version: Dairy-free mozzarella shreds work (look for ones that melt well), and olive oil can replace butter for brushing. Nutritional yeast adds cheesy vibes to the dip.
- Spice it up: Add a pinch of red pepper flakes to the marinara or mix in diced jalapenos if you like heat.
One non-negotiable: That roasted garlic. Powder or jarred minced garlic won’t give the same caramelized sweetness. Roasting a whole head is easier than you think–just wrap, roast, and squeeze out the golden paste. It’s the soul of this recipe!
Equipment Needed for Pull-Apart Roasted Garlic Pizza Dip Sliders
You don’t need fancy gadgets for these sliders–just a few trusty kitchen staples that probably already live in your drawers. Here’s my go-to lineup:
- 9×13 baking dish: The perfect size for fitting 12 sliders snugly. No 9×13? Use two smaller dishes or even a baking sheet with raised edges (just arrange the sliders tightly so they don’t dry out).
- Aluminum foil: Essential for roasting that garlic! I always use heavy-duty foil–it keeps the garlic from burning and makes cleanup a breeze.
- Pastry brush: My secret weapon for evenly coating those bun tops with garlic butter. In a pinch? A folded paper towel works, but you’ll lose some buttery goodness.
- Mixing bowls: One small one for the garlic butter mix, another for combining the pizza dip. Glass or stainless steel are my faves–plastic can hold onto garlic smells.
- Sharp knife: For slicing the garlic head and halving the slider buns. A serrated bread knife glides through the buns without squishing them.
- Silicone spatula: Helps spread the pizza dip evenly without tearing the soft bun bottoms. A spoon works too, but be gentle!
Bonus items I love but aren’t mandatory: kitchen shears for quick herb snipping, a garlic press if you’re lazy like me about mincing, and a microplane for extra-fine Parmesan dusting on top. But honestly? These sliders shine even with just the basics.
How to Make Pull-Apart Roasted Garlic Pizza Dip Sliders
Okay, here’s where the magic happens! I’ve made these sliders so many times I could probably do it in my sleep, but I’ll walk you through each step like I’m right there in the kitchen with you. The key is taking your time with the garlic–that roasted goodness is what makes these unforgettable. Let’s get started!
Step 1: Roasting the Garlic
First things first: preheat that oven to 400F. While it heats up, grab your garlic head and slice about 1/4 inch off the top to expose all those pretty cloves. Don’t worry about peeling them–the foil pouch does all the work! Drizzle the cut side with olive oil (I use my fingers to make sure every clove gets some love), then wrap it up in foil like a little present. Make sure it’s sealed tight so no steam escapes.
Pop it right on the oven rack–no pan needed–and set your timer for exactly 30 minutes. When it’s done, the garlic should smell amazing and the cloves will be soft as butter when pressed. Careful unwrapping–that steam is hot! Let it cool just until you can handle it, then squeeze the bottom to push the golden paste out. It should come out smooth and caramel-colored. If any cloves resist, use a small fork to coax them out. This is liquid gold, people!
Step 2: Assembling the Sliders
While your garlic cools slightly, grab your slider buns. Keep them connected–we’re making pull-apart sliders here! Use a serrated knife to slice the whole pack in half horizontally (like you’re making one giant sandwich). Place the bottom halves in your baking dish–they should fit snugly. Now, mix that gorgeous roasted garlic with marinara, mozzarella, Parmesan, and herbs in a bowl. The smell alone will make your stomach growl!
Here’s my pro tip: spread the mixture evenly with a spatula, leaving about a 1/2-inch border around the edges. This keeps the dip from bubbling over and making a mess. Don’t press too hard–you want those bun bottoms to stay fluffy. Once it’s spread, nestle the top halves back on like a cozy blanket. Now for the finishing touch: whisk together melted butter and garlic powder, then brush it generously over the tops. Get those edges good–that’s where the best crispy bits form!
Step 3: Baking to Perfection
Slide those beauties onto the middle oven rack (this ensures even baking) and watch the magic happen. In about 15 minutes, you’ll see the tops turn golden brown and hear the cheese bubbling underneath. That sizzle is your cue to check–the sliders are done when the cheese is fully melted and the edges look crispy. If your oven runs hot, peek at 12 minutes to prevent over-browning.
Let them rest for 5 minutes before serving–I know, the wait is torture! This helps the cheese set slightly so each slider pulls apart cleanly. When you’re ready, use a big spatula to transfer the whole batch to a platter or serve right from the dish. Warning: your kitchen will smell like an Italian bistro, and hungry friends will appear out of nowhere!
Tips for Perfect Pull-Apart Roasted Garlic Pizza Dip Sliders
Alright, I’ve made these sliders more times than I can count, and I’ve picked up some tricks along the way to make them absolutely foolproof. Here’s my best advice to get these sliders perfect every single time:
- Cool the roasted garlic just right: I know it’s tempting to dive right in, but give the garlic a few minutes to cool after roasting. It’ll be easier to handle, and you won’t burn your fingers trying to squeeze out those soft cloves. Trust me, I’ve learned this the hard way!
- Brush butter to the edges: That garlic butter mixture? Don’t skimp on the edges of the buns! Those crispy, golden bits are the best part, and brushing the butter all the way to the edges ensures every bite is buttery perfection.
- Serve immediately: These sliders are at their absolute best fresh out of the oven. The cheese is gooey, the buns are warm, and the garlic aroma is irresistible. If you let them sit too long, the buns can get soggy–so call everyone to the table as soon as they come out!
- Use a serrated knife for clean cuts: When slicing the buns, a serrated knife is your best friend. It glides through without squishing the bread, so your sliders stay fluffy and intact.
- Don’t overstuff the dip: It’s tempting to pile on the cheesy mixture, but leave that 1/2-inch border around the edges. This keeps the dip from spilling out and making a mess in the oven. Plus, it ensures every slider gets just the right amount of filling.
Follow these tips, and you’ll have sliders that are golden, gooey, and downright addictive. Oh, and one last thing–make a double batch. These disappear faster than you can say “garlic heaven!” You can find more inspiration on my Pinterest page.
Serving Suggestions for Pull-Apart Roasted Garlic Pizza Dip Sliders
Now that you’ve got these gorgeous golden sliders fresh from the oven, let’s talk about how to serve them up in style! I love making these the star of any gathering, but a few simple accompaniments can turn them into a full spread that’ll wow your guests. Here’s how I like to do it:
- Extra marinara for dipping: I always warm up a small bowl of extra marinara on the side–it’s perfect for those who want an extra saucy bite. Sometimes I’ll spike it with a pinch of red pepper flakes or a splash of balsamic for depth.
- Fresh herb confetti: A handful of torn basil leaves or a sprinkle of chopped parsley adds a pop of color and freshness that cuts through the richness. I scatter it over the top right before serving so it keeps its vibrant green.
- Crisp veggie sticks: Carrot and celery sticks make a great crunchy contrast to the soft sliders. They’re also perfect for scooping up any cheesy bits that escape!
- Light salad pairing: A simple arugula salad with lemon vinaigrette balances the sliders beautifully. The peppery greens and bright dressing cut through all that garlicky goodness.
- Pickled peppers on the side: For a tangy kick, I’ll often put out a bowl of pepperoncini or banana pepper rings. Their vinegar punch wakes up all those rich flavors.
When I’m feeling fancy, I’ll arrange everything on a big wooden board with the sliders in the center–it makes for such a fun, shareable spread. Pro tip: Keep napkins handy because these sliders are deliciously messy in the best possible way!
Storing & Reheating Pull-Apart Roasted Garlic Pizza Dip Sliders
Okay, let’s be real–these sliders rarely last long enough to store! But just in case you miraculously have leftovers (or you’re smart enough to make a double batch), here’s how to keep them tasting fresh:
Storing leftovers: Once cooled, tuck those sliders into an airtight container with a snug lid. They’ll keep in the fridge for up to 3 days, though the buns get a tad softer over time. Pro tip: Layer parchment between slices if stacking to prevent sticking. The garlic aroma might make your fridge smell amazing–consider that a bonus!
Reheating magic: Never, ever microwave these–you’ll end up with soggy sadness. Instead, revive them in a 350F oven for about 10 minutes until heated through. I like to loosely tent with foil to prevent over-browning. For extra crispiness, remove the foil for the last 2 minutes and brush with a little fresh garlic butter.
Freezer option: If you must freeze (maybe you prepped for a future party?), wrap the whole block tightly in foil then plastic wrap. Thaw overnight in the fridge before reheating. Texture won’t be *quite* as perfect, but it’s still pretty darn good in a pinch!
My favorite trick: Transform day-old sliders into garlic bread! Slice them vertically into strips, brush with olive oil, and toast under the broiler for 2 minutes. Instant crispy-cheesy garlic breadsticks perfect for dipping in soup or marinara.
Nutritional Information
Here’s the breakdown for one slider, but keep in mind these values are estimates based on the specific ingredients I use. If you swap in different brands or make substitutions, the numbers might change slightly. That said, this gives you a good idea of what you’re working with:
- Calories: 180
- Total Fat: 9g
- Saturated Fat: 4g
- Unsaturated Fat: 4g
- Trans Fat: 0g
- Cholesterol: 15mg
- Sodium: 320mg
- Total Carbohydrates: 18g
- Dietary Fiber: 1g
- Sugars: 3g
- Protein: 7g
Note: These values are estimates and can vary based on the brands of ingredients you use or any substitutions you make. For example, using low-fat cheese or gluten-free buns will alter the nutritional profile. Always double-check labels if you’re tracking specific dietary needs!
FAQs About Pull-Apart Roasted Garlic Pizza Dip Sliders
I get so many questions about these sliders–and I love it! Here are the answers to the ones I hear most often. Trust me, these tips will make your slider game even stronger:
- Can I make these ahead? Absolutely! Roast the garlic and mix the dip up to a day in advance. Store it in the fridge, then assemble and bake when you’re ready. Just let the dip come to room temp for easier spreading.
- What if I don’t have slider buns? No worries! Use dinner rolls, Hawaiian rolls, or even mini baguettes sliced into pieces. Just make sure whatever you use is soft and sturdy enough to hold the dip without falling apart.
- How to adjust the spice level? Want it spicy? Add red pepper flakes to the dip or brush the tops with a mix of melted butter and hot sauce. For a milder version, skip the garlic powder in the butter topping.
- Can I freeze leftovers? You can, but the texture won’t be quite the same. Wrap tightly in foil and freeze for up to a month. Reheat in the oven (not the microwave!) to bring back some of that crispiness.
- Best cheese blend alternatives? Mozzarella is classic, but try blending in provolone for extra tang or fontina for creaminess. For a sharper flavor, swap half the mozzarella for aged cheddar or asiago. Just keep it melty!
There you go–everything you need to know to make these sliders shine. Got more questions? Just ask! I’m always happy to help you nail this recipe.
Print
Irresistible Pull-Apart Roasted Garlic Pizza Dip Sliders in 30 Minutes
- Prep Time: 15 minutes
- Cook Time: 45 minutes
- Total Time: 60 minutes
- Yield: 12 sliders 1x
- Category: Appetizer
- Method: Baking
- Cuisine: Italian-American
- Diet: Vegetarian
Description
Pull-apart roasted garlic pizza dip sliders are a delicious and shareable appetizer. Perfect for parties or gatherings.
Ingredients
- 1 head of garlic
- 2 tbsp olive oil
- 1 cup marinara sauce
- 1 cup shredded mozzarella cheese
- 1/2 cup grated Parmesan cheese
- 1 tsp dried oregano
- 1 tsp dried basil
- 12 slider buns
- 1/4 cup melted butter
- 1 tsp garlic powder
Instructions
- Preheat oven to 400°F.
- Cut the top off the garlic head, drizzle with olive oil, wrap in foil, and roast for 30 minutes.
- Squeeze roasted garlic into a bowl and mix with marinara sauce, mozzarella, Parmesan, oregano, and basil.
- Cut slider buns in half horizontally and place the bottom half in a baking dish.
- Spread the garlic-pizza mixture evenly over the bottom half of the buns.
- Place the top half of the buns back on.
- Mix melted butter and garlic powder, then brush over the top of the sliders.
- Bake for 15 minutes or until golden and bubbly.
- Serve warm.
Notes
- Use fresh garlic for best flavor.
- Adjust cheese quantities to taste.
- Serve immediately for optimal texture.
Nutrition
- Serving Size: 1 slider
- Calories: 180
- Sugar: 3g
- Sodium: 320mg
- Fat: 9g
- Saturated Fat: 4g
- Unsaturated Fat: 4g
- Trans Fat: 0g
- Carbohydrates: 18g
- Fiber: 1g
- Protein: 7g
- Cholesterol: 15mg