I’ll never forget the first time I made these chocolate chip pudding cookies. It was a cold, rainy Saturday, and I was feeling a little blue, craving something truly comforting. My go to chocolate chip cookie recipe just wasn’t cutting it, and I wanted a cookie that felt extra special, like a warm hug. I’d seen a whisper of an idea online about adding instant pudding mix to cookies, and my curiosity was instantly piqued. I decided to give it a try, and honestly, it changed my cookie game forever. These aren’t just cookies; they’re an experience, and I can’t wait for you to try them.
Table of Content
- Why You’ll Love My Chocolate Chip Pudding Cookies
- What You Will Need
- Ingredient Notes and My Favorite Swaps
- My Step by Step Chocolate Chip Pudding Cookies Instructions
- My Top Pro Tips
- Serving Suggestions
- Storing and Reheating Your Cookies
- A Quick Note on Nutrition
- FAQs About These Cookies
- Share Your Cookie Moments With Me!
Why You’ll Love My Chocolate Chip Pudding Cookies
I know what you’re thinking: another chocolate chip cookie recipe? But trust me, these chocolate chip pudding cookies are different. Here’s why I think you’ll fall head over heels for them:
- They’re unbelievably soft and chewy: The secret ingredient, instant pudding mix, gives them this incredible tenderness and keeps them moist for days. You won’t find a dry cookie here, promise!
- The flavor is next level: That little bit of vanilla or even chocolate pudding mix just deepens the overall flavor profile, making them taste richer and more complex than your average chocolate chip cookie.
- They’re super easy to make: No fancy techniques or tricky steps here. If you can make regular cookies, you can definitely make these. I designed this recipe for busy days when you need a little cookie magic.
- They stay fresh longer: Thanks to the pudding mix, these cookies resist drying out. So, if you manage not to eat them all in one sitting (good luck with that!), they’ll still be delicious tomorrow.
- They’re incredibly adaptable: You can swap out the pudding flavor, change the chocolate, or add your favorite mix ins. I’ll give you my best ideas below!
What You Will Need
Making my favorite chocolate chip pudding cookies requires just a few standard baking ingredients, plus that one special secret. Here’s a list of what you’ll need to get started:
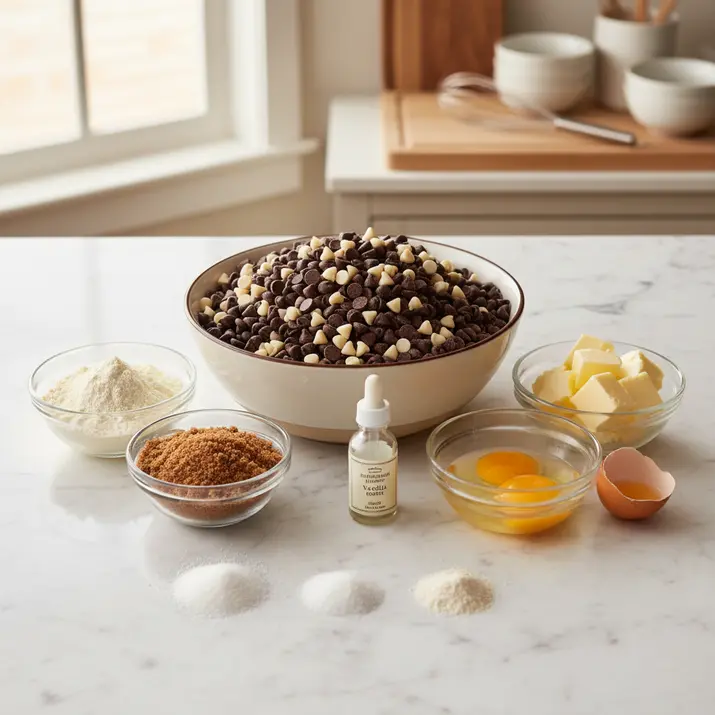
- All purpose flour: The foundation of our cookie. I always use unbleached.
- Baking soda: For that perfect lift and spread. Don’t skip it!
- Salt: Just a pinch to balance all that sweetness and enhance the chocolate flavor. I usually go for fine sea salt.
- Unsalted butter: Make sure it’s softened to room temperature. This is crucial for creaming it properly with the sugars. I’ve made the mistake of using cold butter, and it just doesn’t mix right.
- Granulated sugar: For sweetness and crisp edges.
- Light brown sugar: This is key for chewiness and moisture, plus that delicious molasses flavor. I love how it complements the chocolate.
- Large eggs: These bind everything together and add richness. Mine are always at room temperature too; it helps them incorporate better.
- Vanilla extract: Use the good stuff! It makes a huge difference in the final taste. I’m a big fan of pure vanilla.
- Instant vanilla pudding mix: This is our star! Make sure it’s instant, not cook and serve. I’ve used both vanilla and cheesecake flavors, and they both work wonders.
- Chocolate chips: I usually do a mix of semi sweet and milk chocolate, but use whatever your heart desires.
Ingredient Notes and My Favorite Swaps
I’ve made these chocolate chip pudding cookies so many times, I’ve tried just about every variation. Here are some personal notes and swaps I’ve discovered:
- Pudding Power: I almost always use instant vanilla pudding mix because it enhances the classic cookie flavor without overpowering it. But don’t be shy! I’ve successfully used instant chocolate pudding mix for double chocolate cookies, and even butterscotch for a fun twist. Just remember, instant is the key. Cook and serve won’t work the same, and I once accidentally grabbed the wrong box. My cookies were… interesting.
- Butter Temperature is Your Friend: Seriously, I can’t stress enough how important room temperature butter is. If it’s too cold, it won’t cream properly, and your cookies will be dense. If it’s too soft (like melted), they’ll spread too much. I usually leave mine out for about an hour or two before baking.
- Chocolate Choices: My go to is a mix of semi sweet chocolate chips and milk chocolate chips. Sometimes I’ll throw in some dark chocolate chunks for a more intense flavor. White chocolate chips are also delicious, especially with the vanilla pudding. Feel free to use whatever chocolate you love, or even chop up your favorite chocolate bar.
- Egg Talk: Just like the butter, room temperature eggs mix into the batter much more smoothly, giving you a more uniform dough. I usually set mine out with the butter.
- Mix Ins for Fun: This recipe is a fantastic base for adding other goodies. I’ve added chopped walnuts or pecans, shredded coconut, or even a handful of crushed pretzels for a salty sweet crunch. Get creative!
My Step by Step Chocolate Chip Pudding Cookies Instructions
Alright, let’s get baking! Don’t worry, I’ll walk you through each step just like we’re in my kitchen together.

Follow these steps for perfect results
-
- Prep Your Space: First things first, go ahead and preheat your oven to 350F (175C). While it’s warming up, line two baking sheets with parchment paper. Trust me on the parchment paper; it makes cleanup a breeze and helps prevent sticking.
- Whisk the Dry Stuff: In a medium bowl, I usually grab my trusty whisk and combine the all purpose flour, baking soda, and salt. Give it a good whisk until everything is well mixed. This step ensures all those leavening agents are evenly distributed, so your cookies rise beautifully.
- Cream the Butter and Sugars: Now for the fun part! In a large bowl, using an electric mixer, beat the softened unsalted butter with the granulated sugar and light brown sugar. I like to beat it on medium speed until it’s light and fluffy, usually about 2 to 3 minutes. Scrape down the sides of the bowl a couple of times to make sure everything gets combined. This creaming process adds air to your dough, which makes for soft cookies.
- Add the Wet Ingredients (and the Secret!): With the mixer still going on medium low, beat in the eggs one at a time, making sure each one is fully incorporated before adding the next. Then, stir in the vanilla extract. Finally, add that instant pudding mix powder to the wet ingredients and mix until just combined. It will look a little thick, and that’s totally normal.
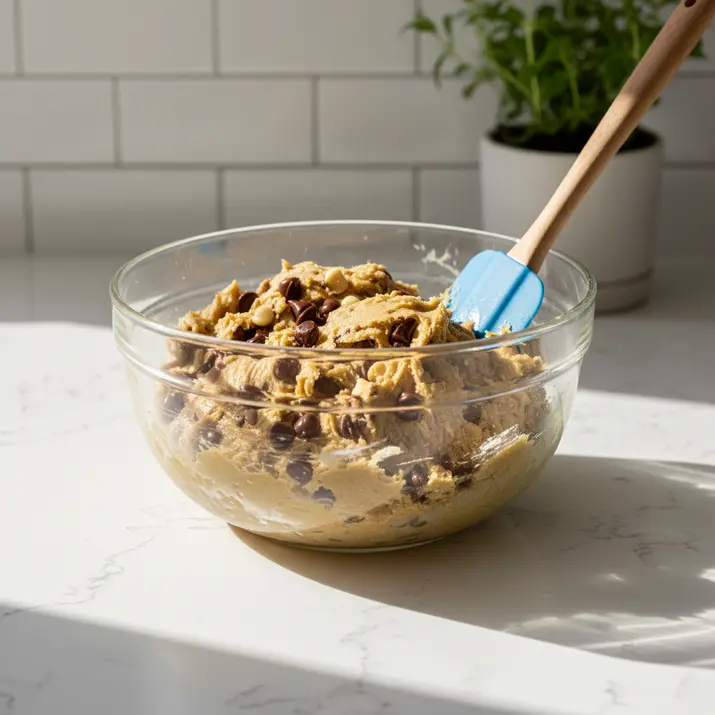
- Combine Wet and Dry: Reduce your mixer speed to low, and gradually add the dry ingredient mixture to the wet ingredients. Mix only until just combined. It’s super important not to overmix here, otherwise, you’ll end up with tough cookies. I usually stop as soon as I don’t see any streaks of flour.
- Fold in the Chocolate: Remove the bowl from the mixer and, using a sturdy spatula, gently fold in your chocolate chips. I like to do this by hand to avoid crushing the chips and to make sure they’re evenly distributed throughout the dough.
- Scoop and Chill (My Recommendation!): Drop rounded tablespoon sized scoops of dough onto your prepared baking sheets, leaving about 2 inches between each cookie. Now, here’s my personal secret for perfectly thick, chewy cookies: I like to chill the scooped dough for at least 30 minutes in the refrigerator. If you’re short on time, you can skip it, but I promise the texture is better if you let them chill.
- Bake Time: Pop those baking sheets into your preheated oven. Bake for 9 to 12 minutes, or until the edges are lightly golden brown and the centers still look a little soft. Remember, every oven is different, so keep an eye on them. I usually pull mine out right when the edges set, because I love a gooey center.
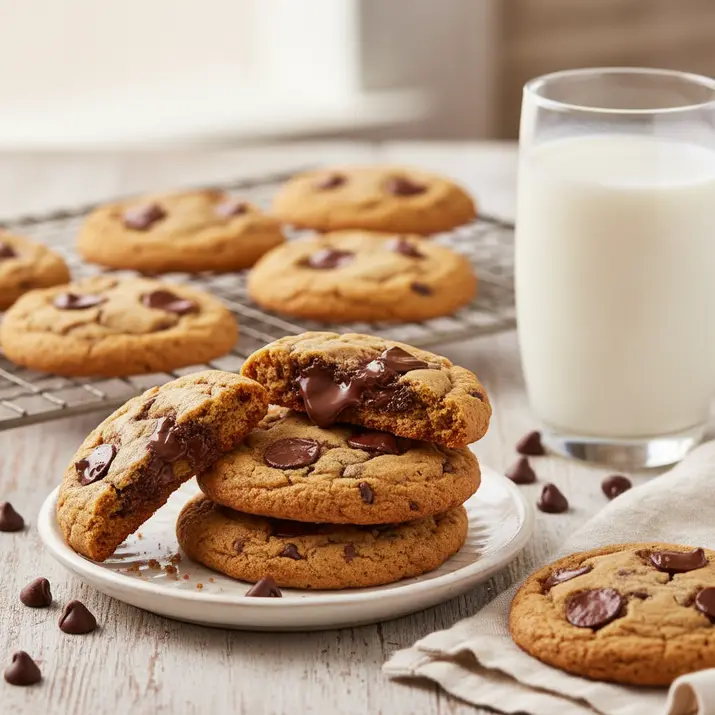
- Cool Down: Once they’re out of the oven, let the cookies cool on the baking sheets for about 5 minutes. They’ll continue to set up during this time. Then, carefully transfer them to a wire rack to cool completely. Or, if you’re like me, enjoy one warm, right off the tray!
My Top Pro Tips
Through countless batches of these chocolate chip pudding cookies, I’ve picked up a few tricks. These are my personal tried and true tips to help you get the best results every time:
- Don’t Overmix: I know I mentioned it before, but seriously, this is probably the most common cookie mistake. Overmixing develops the gluten in the flour, leading to tough, cakey cookies instead of soft, chewy ones. Mix until just combined, no more.
- Chill the Dough (if you can!): While not strictly required, chilling the dough for at least 30 minutes (or even overnight!) really improves the texture and flavor. It helps prevent spreading, makes the cookies thicker, and allows the flavors to meld. I swear by it, especially on a warmer day.
- Room Temperature Ingredients: Make sure your butter and eggs are at room temperature. This helps them emulsify better, creating a smoother, more uniform dough, which in turn leads to a better cookie. If you forget, a quick microwave burst for butter (very short!) or placing eggs in warm water works in a pinch.
- Underbake Slightly: For that perfect soft, chewy center, take the cookies out of the oven when the edges are set and lightly golden, but the centers still look a bit soft. They’ll continue to cook slightly on the hot baking sheet.
- Good Quality Chocolate: Since chocolate chips are a star here, I recommend using a brand you really enjoy eating on its own. It makes a big difference in the final taste of your chocolate chip pudding cookies.
- Parchment Paper is Your Friend: It really does make for easier cleanup and helps ensure your cookies don’t stick. Plus, they slide right off onto the cooling rack.
Serving Suggestions
These chocolate chip pudding cookies are amazing all on their own, but if you want to make them an even bigger treat, I have a few ideas that I just love:
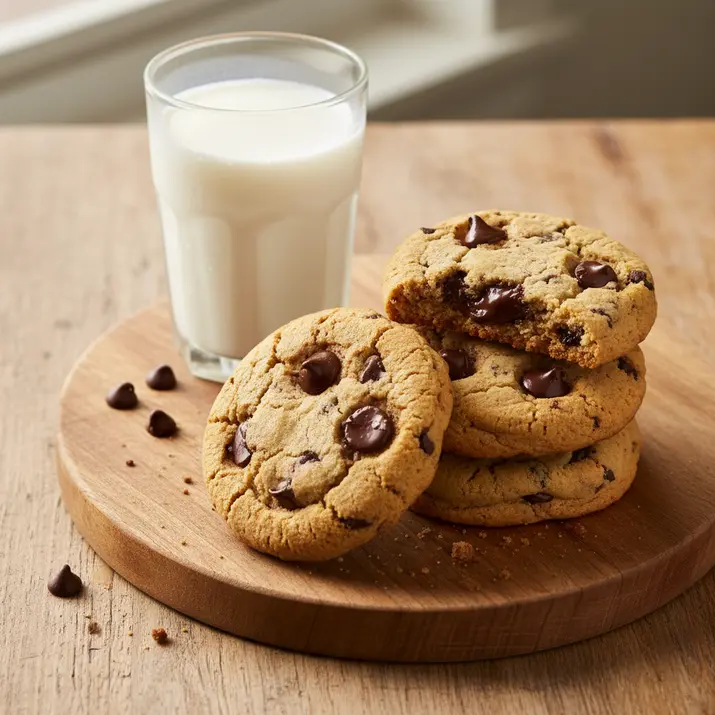
- With a Cold Glass of Milk: You can’t go wrong with this classic pairing. It’s pure nostalgia for me.
- Warm with Ice Cream: A warm chocolate chip pudding cookie with a scoop of vanilla bean ice cream? Absolute heaven. The contrast in temperatures and textures is just divine. I sometimes even make little cookie ice cream sandwiches.
- Coffee or Tea Time: They’re perfect with your morning coffee or an afternoon tea. It’s my little indulgence.
- Cookie Skillet: Press the dough into a small oven safe skillet, bake until gooey, and serve warm with ice cream and a drizzle of caramel sauce. Talk about impressive!
Storing and Reheating Your Cookies
Let’s be real, these cookies usually disappear fast in my house! But if you happen to have leftovers (a rare occurrence for me), here’s how I store and reheat them to keep them tasting fresh:
- At Room Temperature: I store cooled cookies in an airtight container on the counter for up to 3 to 4 days. The pudding mix really helps them stay soft longer than most cookies.
- Freezing Baked Cookies: If you’ve baked a big batch and want to save some, I let them cool completely, then place them in a freezer safe bag or container. They’ll keep well for up to 2 months. Just pull them out and let them thaw at room temperature.
- Freezing Dough: You can also scoop the dough onto a parchment lined baking sheet, freeze until solid, then transfer the frozen dough balls to a freezer safe bag. Bake them straight from frozen, adding a couple of extra minutes to the baking time. It’s perfect for when you need a warm chocolate chip pudding cookie fix on demand!
- Reheating: My favorite way to warm them up is in the microwave for about 10 to 15 seconds. It makes them wonderfully soft and gooey, almost like they just came out of the oven. You can also pop them in a toaster oven for a few minutes.
A Quick Note on Nutrition
I’m a firm believer that some things are just meant to be enjoyed, and homemade cookies definitely fall into that category! While I haven’t personally calculated the nutritional information for these chocolate chip pudding cookies, they are a delicious treat meant for indulgence. Please keep in mind that nutritional values can vary based on the specific brands of ingredients you use and the exact size of your cookies. So, go ahead, enjoy one (or two!) and savor every moment.
FAQs About These Cookies
When my friends try these, they always have a few questions. Here are the common ones I get, and my honest answers:
- Can I use sugar free pudding mix? I haven’t personally tried sugar free pudding mix, but I’ve heard from others that it works! Just be aware that the texture and sweetness might be slightly different. If you try it, let me know how it goes!
- What if I don’t have light brown sugar? You could use all granulated sugar, but your cookies might be a little less chewy and have a slightly different flavor. I really recommend sticking to the brown sugar for that perfect texture.
- Do I have to chill the dough? No, you don’t have to, but I really, really recommend it! It makes a noticeable difference in preventing spread and giving you a thicker, chewier cookie. If you’re in a rush, they’ll still be good, just maybe a little flatter.
- My cookies spread too much! What happened? This can happen if your butter was too soft, your oven wasn’t hot enough, or if you didn’t chill the dough. Make sure your butter is just softened, not melted, and check your oven temperature with an oven thermometer if you suspect it’s off.
- Can I use any flavor of instant pudding? Absolutely! Vanilla is my go to for classic chocolate chip pudding cookies, but I’ve had great success with chocolate, cheesecake, and even butterscotch. Experiment and find your favorite!
- How do I know when they’re done? Look for edges that are lightly golden brown and centers that still look a little soft. They will firm up as they cool, so don’t wait until the centers are fully set in the oven, or they’ll be overbaked and less chewy.
Share Your Cookie Moments With Me!
I truly hope you love these chocolate chip pudding cookies as much as I do. They’ve become a staple in my home, and they always bring a smile to everyone’s face. If you try them, I’d absolutely love to hear about it! Did you use a different pudding flavor? Add some fun mix ins? Or maybe you just enjoyed them warm with a giant glass of milk. Whatever your cookie moment, please share it with me in the comments below. Happy baking, my friend!
Chocolate Chip Pudding Cookies
Ingredients
Method
- First things first, go ahead and preheat your oven to 350°F (175°C). While it’s warming up, line two baking sheets with parchment paper. Trust me on the parchment paper; it makes cleanup a breeze and helps prevent sticking.
- In a medium bowl, I usually grab my trusty whisk and combine the all purpose flour, baking soda, and salt. Give it a good whisk until everything is well mixed. This step ensures all those leavening agents are evenly distributed, so your cookies rise beautifully.
- Now for the fun part! In a large bowl, using an electric mixer, beat the softened unsalted butter with the granulated sugar and light brown sugar. I like to beat it on medium speed until it’s light and fluffy, usually about 2 to 3 minutes. Scrape down the sides of the bowl a couple of times to make sure everything gets combined. This creaming process adds air to your dough, which makes for soft cookies.
- With the mixer still going on medium low, beat in the eggs one at a time, making sure each one is fully incorporated before adding the next. Then, stir in the vanilla extract. Finally, add that instant pudding mix powder to the wet ingredients and mix until just combined. It will look a little thick, and that’s totally normal.
- Reduce your mixer speed to low, and gradually add the dry ingredient mixture to the wet ingredients. Mix only until just combined. It’s super important not to overmix here, otherwise, you’ll end up with tough cookies. I usually stop as soon as I don’t see any streaks of flour.
- Remove the bowl from the mixer and, using a sturdy spatula, gently fold in your chocolate chips. I like to do this by hand to avoid crushing the chips and to make sure they’re evenly distributed throughout the dough.
- Drop rounded tablespoon sized scoops of dough onto your prepared baking sheets, leaving about 2 inches between each cookie. Now, here’s my personal secret for perfectly thick, chewy cookies: I like to chill the scooped dough for at least 30 minutes in the refrigerator. If you’re short on time, you can skip it, but I promise the texture is better if you let them chill.
- Pop those baking sheets into your preheated oven. Bake for 9 to 12 minutes, or until the edges are lightly golden brown and the centers still look a little soft. Remember, every oven is different, so keep an eye on them. I usually pull mine out right when the edges set, because I love a gooey center.
- Once they’re out of the oven, let the cookies cool on the baking sheets for about 5 minutes. They’ll continue to set up during this time. Then, carefully transfer them to a wire rack to cool completely. Or, if you’re like me, enjoy one warm, right off the tray!