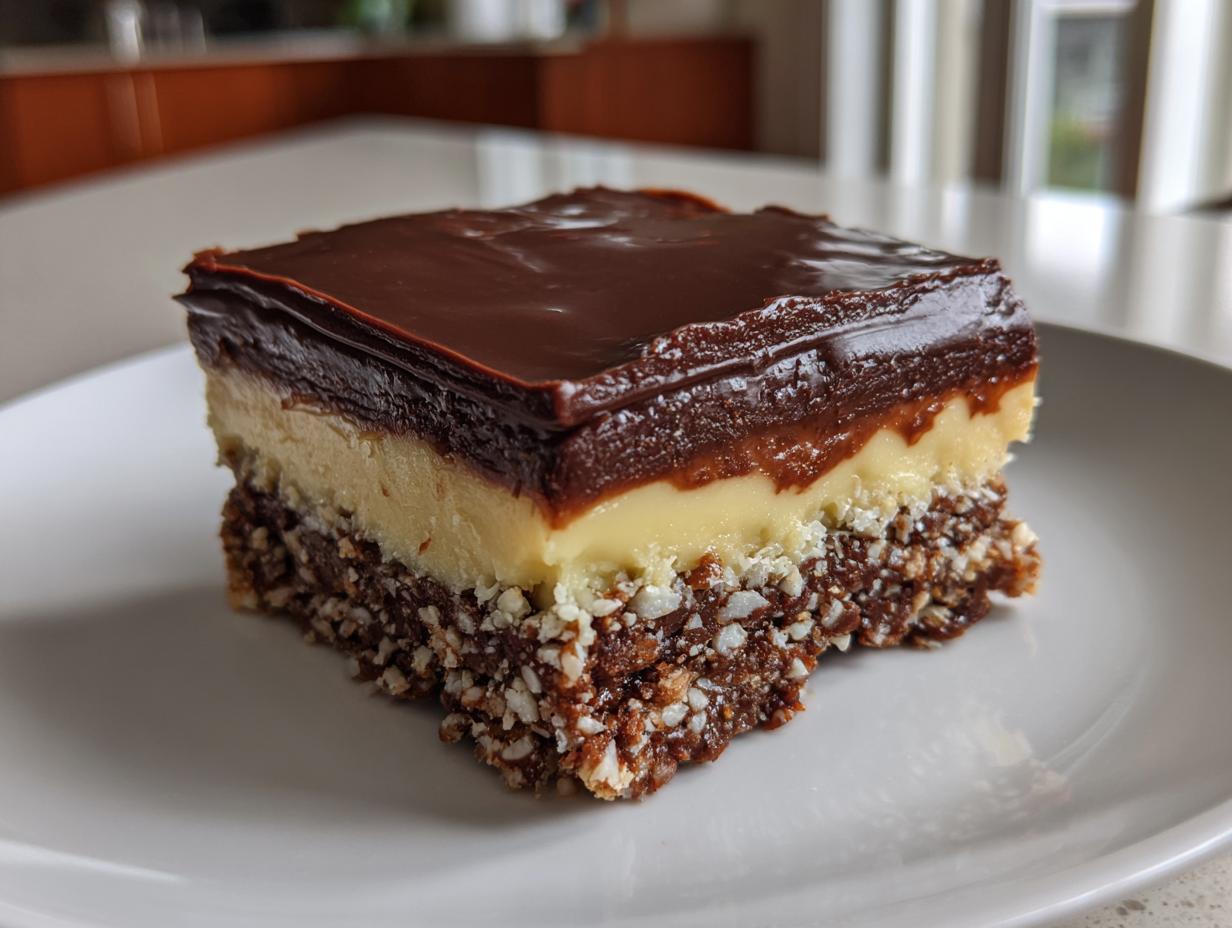
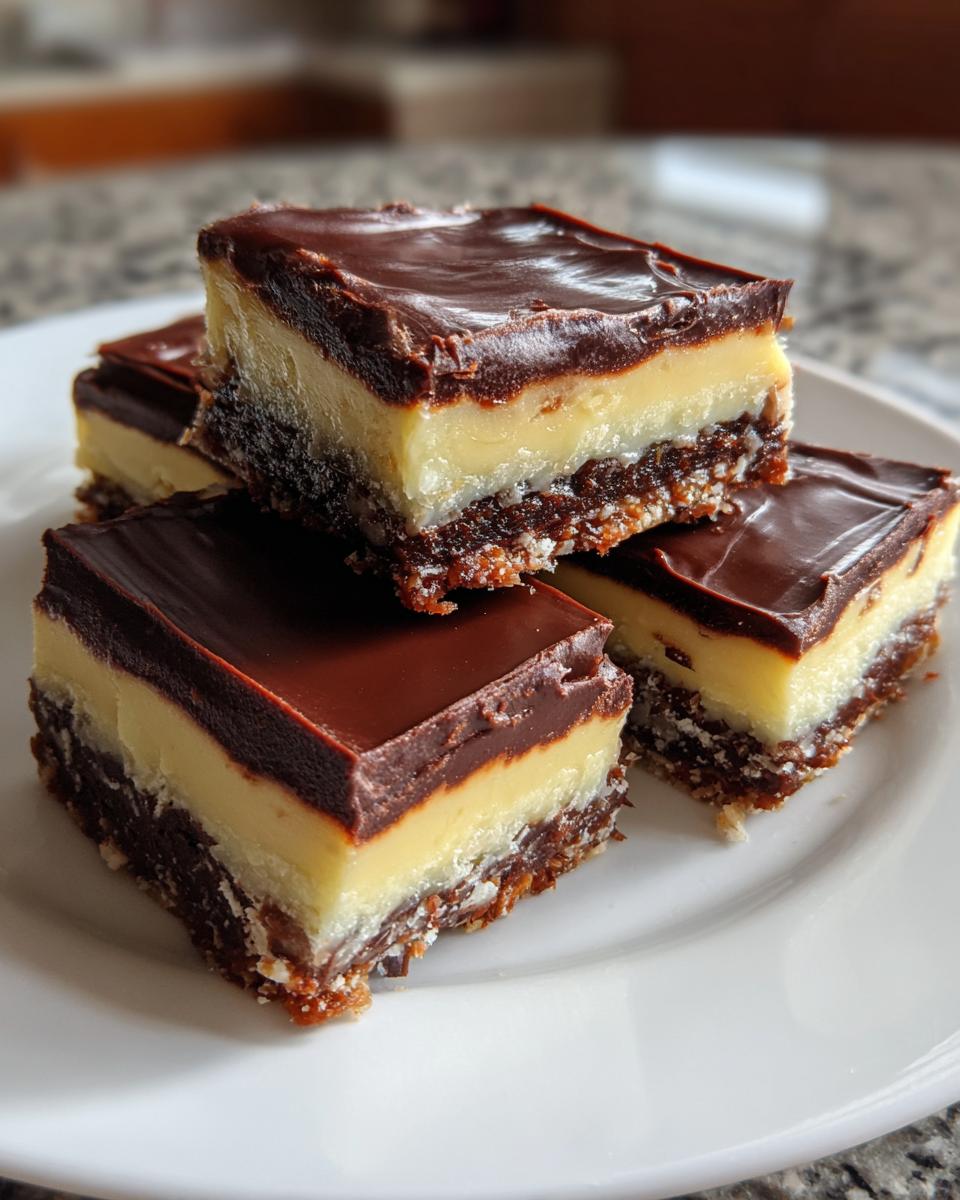
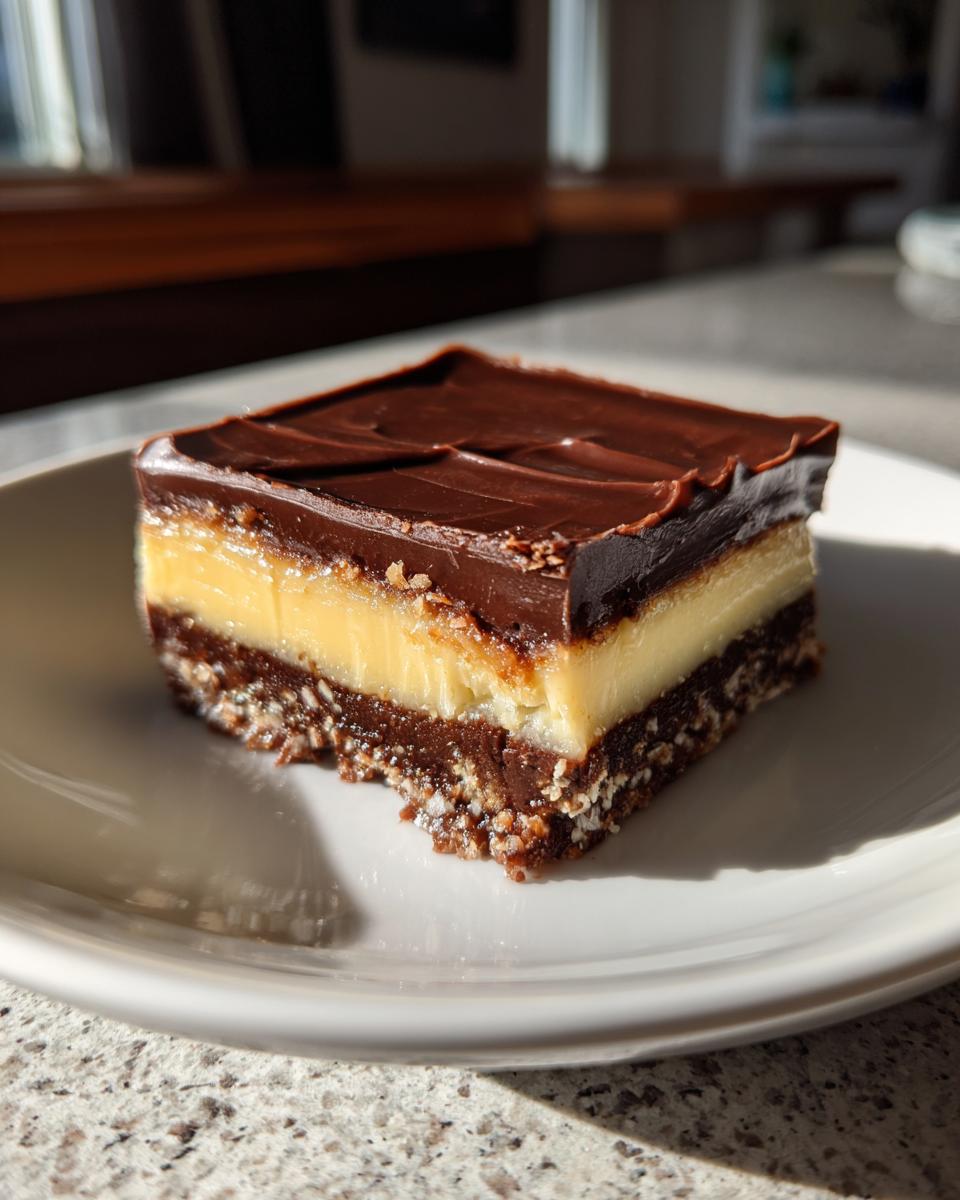
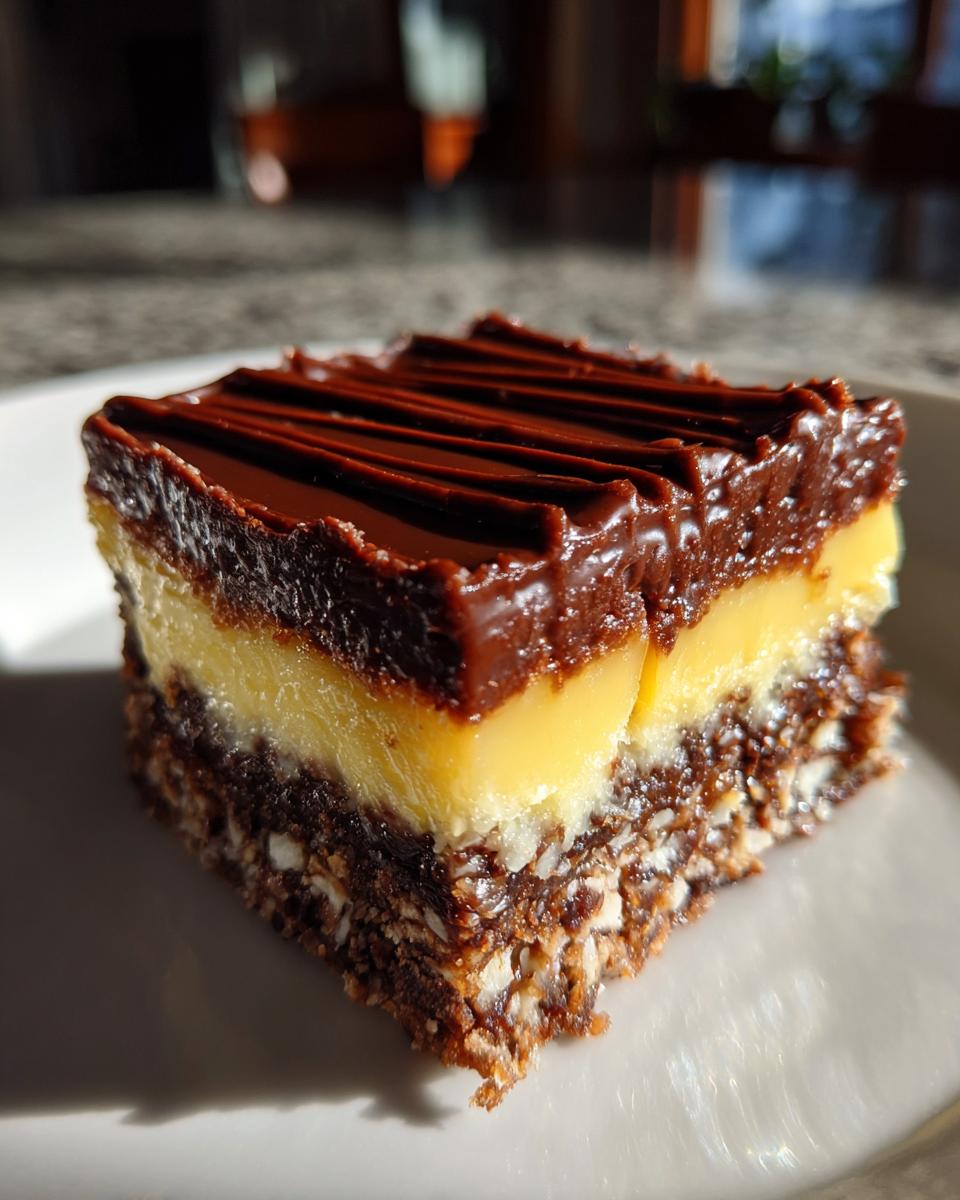
I still remember the first time I bit into a Nanaimo Bar at a little bakery in British Columbia – that crumbly chocolate base, the velvety custard filling, and the glossy chocolate topping all melting together in perfect harmony. These iconic Canadian no-bake treats have been my go-to dessert ever since, especially when I need something impressive but don’t want to turn on the oven. What I love most is how these three simple layers transform basic pantry ingredients into pure magic. Just wait until you see how easy it is to make these crowd-pleasing bars that taste like they came straight from a Vancouver Island cafe.
Why You’ll Love These Nanaimo Bars
Listen, I know everyone claims their dessert recipe is special, but Nanaimo Bars? They’re in a league of their own. Here’s why these Canadian treats will become your new obsession:
- No oven required – perfect for hot summer days or when you’re just feeling lazy
- Only 30 minutes active time for a dessert that looks like you spent hours
- That magical trio of textures – crunchy, creamy, and melt-in-your-mouth chocolate
- Customizable layers (my sister always doubles the custard, no judgment!)
- Always disappears first at potlucks – guaranteed crowd-pleaser
Quick and No-Bake Convenience
Honestly, the best part? You can make Nanaimo Bars with just a saucepan, mixing bowl, and your bare hands (for pressing that delicious base, of course). No fancy equipment, no waiting for the oven to preheat – just pure, uncomplicated dessert magic.
Irresistible Texture and Flavor
The first bite tells the whole story – the crumbly coconut-walnut base gives way to that dreamy custard middle, all wrapped up in a chocolate blanket. It’s like three desserts in one! My grandma used to say good Nanaimo Bars should make you close your eyes on the first bite… and she wasn’t wrong.
Ingredients for Nanaimo Bars
Okay, let’s talk ingredients – and trust me, you’ll probably have most of these in your pantry already! I’ve grouped everything by layer because that’s how my brain works when I’m making these. Pro tip: measure everything before you start – it makes the process so much smoother when you’re not digging through cabinets mid-recipe.
- For the Chocolate Base:
- 1/2 cup unsalted butter, melted (the good stuff – none of that margarine nonsense)
- 1/4 cup granulated sugar (just regular white sugar works perfectly)
- 5 tbsp cocoa powder (I use Dutch-processed for that deep chocolate flavor)
- 1 egg, beaten (room temperature is best here)
- 1 3/4 cups graham cracker crumbs (about 12 full sheets if you’re crushing your own)
- 1 cup shredded coconut (medium shred gives the best texture)
- 1/2 cup chopped walnuts (or pecans if that’s what you’ve got)
- For the Custard Layer:
- 1/4 cup custard powder (this is the magic ingredient – don’t skip it!)
- 2 cups powdered sugar (sift it if it’s lumpy – takes 30 seconds and makes a difference)
- 1/2 cup unsalted butter, softened (leave it out for an hour before starting)
- 3 tbsp milk (whole milk makes it extra creamy)
- For the Chocolate Topping:
- 4 oz semi-sweet chocolate (chips or chopped bar – quality matters here)
- 2 tbsp unsalted butter (helps the chocolate set with the perfect snap)
See? Nothing too crazy! The custard powder might be the only thing you need to grab specially, but it’s worth it – that distinctive yellow layer is what makes Nanaimo Bars taste like childhood memories. Now let’s get mixing!
How to Make Nanaimo Bars
Alright, let’s dive into making these Canadian treasures! I’ll walk you through each layer step-by-step – it’s easier than you think, promise. Just follow along and resist the urge to eat all that custard filling straight from the bowl (though no judgment if you sneak a spoonful).
Preparing the Crumb Base
First things first – let’s make that irresistible chocolatey foundation. Grab your saucepan and melt the butter over low heat. Once it’s liquid gold, whisk in the sugar and cocoa powder until it looks like chocolate sauce. Now here’s the important part – add the beaten egg slowly while whisking constantly. You’re making a gentle custard here, so don’t let it boil or you’ll get scrambled eggs in your Nanaimo Bars (yuck!).
When the mixture thickens enough to coat the back of a spoon – about 2 minutes – take it off the heat. Stir in the graham crumbs, coconut, and walnuts until everything’s evenly coated. It should look like wet sand that holds together when you squeeze it. Pour this into your lined 8×8″ pan and press it down firmly with your hands or the bottom of a glass. Really pack it in – this keeps your base from crumbling later. Pop it in the fridge to set while you make the next layer.
Making the Custard Layer
This is where the magic happens! In your mixing bowl, beat the softened butter until it’s creamy and pale – about 2 minutes. Sift in the custard powder and powdered sugar (trust me, sifting prevents lumps that’ll drive you crazy). Add the milk and beat everything together until you’ve got a smooth, dreamy frosting consistency. It should be thick but spreadable – if it’s too stiff, add milk a teaspoon at a time.
Take your chilled base out of the fridge and spread this yellow cloud of happiness evenly over the top. I use an offset spatula for this, but a butter knife works too. Try to get it right to the edges without disturbing the base too much. Back into the fridge it goes for at least 30 minutes to firm up before the chocolate finale.
Adding the Chocolate Topping
Almost there! Melt the chocolate and butter together gently – I use a double boiler (or a heatproof bowl over simmering water) to prevent scorching. Once it’s smooth and shiny, let it cool for about 5 minutes – you want it warm enough to pour but not so hot it melts the custard underneath.
Pour the chocolate over your chilled custard layer and tilt the pan to spread it evenly. Work quickly here – the cold custard will start setting the chocolate almost immediately. If you’re feeling fancy, you can use a toothpick to swirl patterns in the chocolate before it sets completely. One last chill in the fridge (1-2 hours) and you’re ready to slice into these beauties!
Expert Tips for Perfect Nanaimo Bars
After making these bars more times than I can count, I’ve picked up some tricks that’ll take yours from good to “oh-my-gosh-I-need-the-recipe” amazing. Here’s what I wish I knew when I started:
Parchment paper is your best friend. Line your pan with an overhang so you can lift the whole slab out later. Trying to cut these in the pan? Disaster waiting to happen. The first time I didn’t do this, I ended up with more crumbs than bars – lesson learned!
Temperature matters more than you think. That custard layer needs to be completely chilled before adding chocolate, or you’ll get swirls instead of clean layers. I stick my finger in the center – if it feels fridge-cold, you’re good. Impatient bakers (like me) can pop it in the freezer for 15 minutes instead.
Slice with a hot knife. For those picture-perfect squares, run your knife under hot water and dry it between cuts. The heat melts through the chocolate topping cleanly without cracking it. Bonus? No more custard smears on your knife!
Toast your coconut and nuts. This extra 5-minute step makes all the difference! Spread them on a baking sheet at 350F for 3-4 minutes until golden. It brings out this incredible depth of flavor that makes people ask “what’s your secret ingredient?”
Ingredient Substitutions and Notes
Listen, I’m all about making recipes work with what you’ve got! Here’s how to tweak these Nanaimo Bars when your pantry doesn’t cooperate – because nobody should miss out on this Canadian goodness.
Nut-free? Skip the walnuts entirely or swap in sunflower seeds for crunch. My cousin’s allergic, so we’ve made them this way for years – still delicious!
Out of custard powder? This one hurts my Canadian heart, but in a pinch, you can use vanilla pudding mix (though the flavor won’t be quite the same). Or try blending 2 tbsp cornstarch with 1/2 tsp vanilla bean powder.
Dairy-free version? I’ve tested this with vegan butter and coconut oil (measure solid, not melted) in all layers – works like a charm! Use almond milk in the custard and dairy-free chocolate chips for the topping.
Don’t like coconut? Blasphemy! Just kidding – you can replace it with more graham crumbs or even crushed cornflakes for texture. But seriously, try it with coconut first – the flavor mellows beautifully.
One non-negotiable? Real butter. Margarine makes the custard layer taste… off. Trust me, I learned this the hard way at my first Thanksgiving dinner disaster!
Storing and Serving Nanaimo Bars
Here’s the beautiful thing about Nanaimo Bars – they actually get better after a day in the fridge! The flavors meld together, and that custard layer firms up to the perfect consistency. But listen, you’ve got to store them right or you’ll end up with a melty mess.
I always keep mine in an airtight container in the fridge – they’ll stay fresh for up to a week (if they last that long!). Layer them between sheets of parchment paper so they don’t stick together. Want to freeze some for later? These bars freeze like a dream! Just wrap individual squares tightly in plastic wrap, then pop them in a freezer bag for up to 3 months. Thaw overnight in the fridge, and they’ll taste like you just made them.
Now, the best part – serving! I like to take them out of the fridge about 10 minutes before serving to take the chill off. The chocolate topping will still have that satisfying snap, but the custard layer becomes extra creamy. My absolute favorite way to enjoy them? With a strong cup of coffee – the bitterness cuts through the sweetness perfectly. For special occasions, I’ll dust the tops with a little extra cocoa powder or sprinkle some sea salt flakes to really make them pop.
Pro tip: If you’re bringing these to a party, transport them in a cooler with ice packs. That chocolate layer can get melty in warm cars – learned that lesson the hard way at a summer picnic! And whatever you do, don’t leave them out at room temperature for more than an hour or two. That custard layer is worth protecting!
Nanaimo Bars Nutrition Information
Okay, let’s be real – we don’t eat Nanaimo Bars because they’re healthy, we eat them because they’re pure, unadulterated joy in dessert form! But if you’re curious (or just want to plan your indulgence), here’s the breakdown per bar based on my standard recipe:
- Calories: 220 (worth every one!)
- Fat: 14g (8g saturated – hello, butter!)
- Carbs: 22g (18g sugars)
- Fiber: 1g (blame the coconut)
- Protein: 2g (surprise protein from that egg!)
- Sodium: 85mg
Now, here’s my baker’s disclaimer – these numbers can vary based on your specific ingredients. Using dark chocolate instead of semi-sweet? That’ll change the stats. Swap walnuts for almonds? Different nutrition profile. Even the brand of custard powder can make a slight difference. The important thing is that these are meant to be enjoyed in moderation – though I won’t judge if you have two (or three…).
Pro tip: If you’re watching portions, cut them smaller – these bars are rich enough that a 1″ square is often plenty satisfying. Or do what I do – share with friends so you don’t eat the whole pan yourself (not that I’ve ever done that… ahem).
FAQs About Nanaimo Bars
Can I freeze Nanaimo Bars?
Absolutely! These Canadian treats freeze like a dream. Wrap individual squares tightly in plastic wrap, then pop them in a freezer bag for up to 3 months. Thaw overnight in the fridge – they’ll taste just as fresh as the day you made them. My freezer always has a secret stash for emergencies!
What’s the best cocoa powder to use?
For authentic Nanaimo Bars, I swear by Dutch-processed cocoa powder – it gives that deep, rich chocolate flavor without being too bitter. But regular unsweetened cocoa works too in a pinch. Just don’t use hot chocolate mix (yes, I made that mistake once – way too sweet!).
Why did my custard layer turn out grainy?
Ah, the powdered sugar strikes again! Always sift your powdered sugar and custard powder together – it makes all the difference. If you’ve already mixed it and find lumps, try beating the mixture an extra minute or two. Still grainy? Gently warm the bowl over simmering water while mixing (just don’t melt the butter!).
Can I make these gluten-free?
You sure can! Just swap the graham crackers for gluten-free graham crumbs or gluten-free cookie crumbs. All the other ingredients are naturally gluten-free (just double-check your custard powder). My gluten-free friends say they can’t taste the difference!
How do I prevent the chocolate topping from cracking when I cut it?
Two tricks: First, let the bars sit at room temperature for 10 minutes before slicing. Second, use a sharp knife dipped in hot water and wiped dry between cuts. The slight warmth helps the chocolate cut cleanly without shattering. If it does crack? No worries – they’ll still taste amazing!
3-Layer Nanaimo Bars That Taste Like Heaven
- Prep Time: 20 minutes
- Cook Time: 10 minutes
- Total Time: 30 minutes
- Yield: 16 bars 1x
- Category: Dessert
- Method: No-Bake
- Cuisine: Canadian
- Diet: Vegetarian
Description
A no-bake dessert bar with a crumbly base, custard-flavored butter icing, and a chocolate topping.
Ingredients
- 1/2 cup unsalted butter, melted
- 1/4 cup granulated sugar
- 5 tbsp cocoa powder
- 1 egg, beaten
- 1 3/4 cups graham cracker crumbs
- 1 cup shredded coconut
- 1/2 cup chopped walnuts
- 1/4 cup custard powder
- 2 cups powdered sugar
- 1/2 cup unsalted butter, softened
- 3 tbsp milk
- 4 oz semi-sweet chocolate
- 2 tbsp unsalted butter
Instructions
- Mix melted butter, sugar, cocoa, and egg in a saucepan over low heat until thickened.
- Stir in graham crumbs, coconut, and walnuts. Press into a lined pan.
- Beat custard powder, powdered sugar, butter, and milk until smooth. Spread over the base.
- Melt chocolate and butter, then pour over the custard layer.
- Chill until set, then cut into bars.
Notes
- Store in the refrigerator.
- Substitute walnuts with almonds if preferred.
Nutrition
- Serving Size: 1 bar
- Calories: 220
- Sugar: 18g
- Sodium: 85mg
- Fat: 14g
- Saturated Fat: 8g
- Unsaturated Fat: 5g
- Trans Fat: 0g
- Carbohydrates: 22g
- Fiber: 1g
- Protein: 2g
- Cholesterol: 35mg